Thursday, July 3, 2008
Tuesday, May 6, 2008
Gear Head

The gear you carry can be both your glory and your downfall. I am primarily what you would call and Urban Photographer, my subject matter is within the cityscape for the most part. So too much gear can hinder your movements and make the experience a labor rather then a fun outing. On the other hand though you have to plan and not take to little gear.
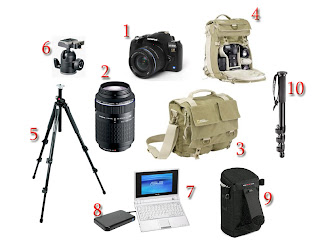
Here is a list of the primary gear I carry and its uses.
1) The Camera, my preference is the Olympus E510, chosen for its 4:3 mount and lightweight body with amazing picture quality features. You need this piece of gear no matter what your preference or brand, and believe me, its worth it to carry it everywhere.
2) Lenses, my camera came with a 14-42mm lens, I acquired a 70-300mm lens to go with it, based on the recommendation from the guys at the Downtown Saneal Camera store. The lens is amazing, it doubles as both a great zoom lens and a fantastic macro lens.
3) The Camera Bag, after a few models I fell in love with this number, its a typical shoulder bag style, but there is lots of room inside, including a separate section to hold the camera. I can pop my camera out and be ready to shoot in seconds. The Hemp fabric is rugged and great looking, there is a zipper water guard along the top and as a tip, spray the bag with fabric guard like you would your couch or carpet and it becomes more water proof. As a bonus its branded by National Geographic, but I used a patch to cover that label, it seems pretentious to have my bag labeled that way. The bag does not attract attention either.
4) This backpack is part of the same National Geographic series, I use it for when I go Bike riding, its comfortable and functional, holds lots of stuff with a separate camera compartment with movable slots. An upper section is separated as well and can hold lots of stuff, like food for long trips, there are 2 pull out sections on the side that can hold water bottles, and even a laptop pouch for a 13-15" laptop, plus there are extra straps and plenty of places to attach extra gear like tripods.
5) Manfrotto Tripod, this beauty has some amazing construction, it works in combination with #6, and has the awesome feature of being able to pull the center pole up and rotate 90 degrees so that means it can drop down to 6 inches from the ground.
7) Asus EEE, this smart 4G solid state laptop works together with my WD 160G passport Hard drive (#8), to act as a great way to transfer images from my cameras 4G CF Memory card. I take this for those long trips, like my recent one to the Zoo, where I filled up the card by lunch time, it took about 15 minutes to complete the transfer and I was ready to go again. Plus its great for taking notes, writing a photoblog from the road and has wireless internet access that rocks.
9) This little addition came from the experience of getting out and shooting a ton, but finding the lens switching less then fast and smooth. its a lens case put out by Lowepro, I have it attached to the exterior rear of my Shoulder bag where it is easily accessible and I can swap a lens quickly and carefully, inside the lid I placed a set of front and read lens covers so that I don't fumble with switching them between lenses, I will show the great modification I have for lens caps and how easy it is to make.
10) Manfrotto Monopod, this easy to carry and nice tall monopod coupled with the same headset I use on the Tripod, its lightweight but durable, it can double as a walking stick on long hikes and is a must for great photos where a tripod is to big or bulky to carry, and can do amazing pan shots.
So thats the primary gear, I also carry a 30" Silver/white reflector which folds down to about 8", its a great thing to have for outdoor portraits or casting a more natural light on plants. Also included in the small side list is UV and polarizer filters, the polarizer helps for exciting blue skys and bringing out detain in cloudy ones, and can kill reflections in water and glass. UV filters really only serve the purpose to protect your lens front and are an easier way to keep a lens clean.
Thats it for this Blog, hope it was helpful, post any comments or questions (if anyone actually reads this, LOL)
Next Blog I will show modifications I created and use for my equipment and some techniques I have picked up.
In case you did not notice it, my Flickr site is located here , check it out, feel free to leave comments.
Thanks for reading.
Friday, May 2, 2008
Inaugural Post
Welcome to my photoblog!
For those unfamiliar with the idea, this is a blog that revolves around my photos and things to do with photography.
So its May first, could it finally be spring here in Calgary? There are signs of it everywhere, below is a picture I took while on a lunchtime walk. I find it helpful to take my camera everywhere, and I take the time during my lunch breaks or walking to and from work to look for photo opportunities. This one for me has a nice warm feeling, I came upon it when as I was walking I realized the light around me was diffuse. Looking up I could see a wonderful sight of the Sun reflecting off of one of the Bankers Hall towers, setting the WB down a few notches and making sure I was shooting at 400 ISO I scanned the scene walked around a few steps to line it up and snapped off a 3 bracket exposure set of shots. I only did a little post work in Photoshop to bring out more detail in the windows and bring out the blue colour in the sky.
My next post (hopefully following a bi-weekly format) will be about gear and bags I use.
Subscribe to:
Posts (Atom)


